SureaCare
Configuration Manual
This document is for the use of an authorised SureaCare installer and not intended for the end user.
Refer all end users to the SureaCare User Manual.
TIP: Enable bookmarks in you PDF viewer to navigate.
Introduction
What is SureaCare?
SureaCare is the alarm generation and message delivery engine within the Surea suite of applications. Its primary function is to generate alarms from data events, and deliver notifications to end users via various methods.
SureaCare has been developed within the health and aged care sector to complement current and legacy nurse call hardware, providing additional functionality that traditional system could not. SureaCare can also interface with other commercial and industrial systems – including fire panels, security systems, RTLS engines, etc.
The user interface for SureaCare is web based to provide greater access to the application across a client’s network, and to minimise additional client software on end user terminals.
This manual is structured in a linear manner to assist in the programming of SureaCare. Following the topics and sub topics sequentially will provide a better understanding of the functions of SureaCare.
Initial Log In
After SureaCare has been installed on the host server, the SureaCare shortcut will be present on the current users’ desktop. This will open the default browser and present the login screen.
If the shortcut is not present, or if accessing from a remote machine, open your web browser and enter the I.P. address/sureacare OR hostname/sureacare.
Examples: http://10.0.0.1/sureacare, http://SUREA-SERVER/sureacare.
Default administrator login:
User: admin
Pass: icsol4950
This default username and password can be changed after your first login.
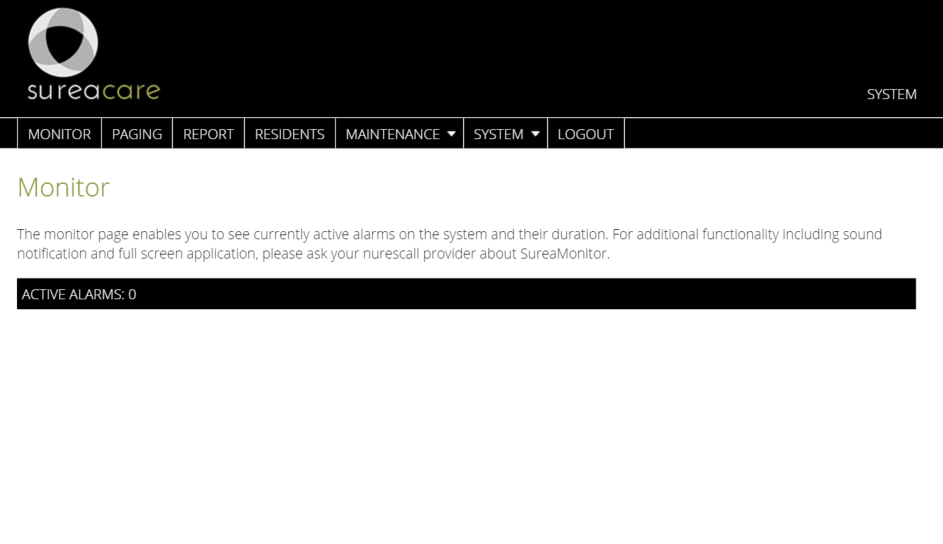
Monitor
When you log in to SureaCare, you are presented with the monitor page. It displays all current active alarms, and the time has elapsed since their activation. Alarms can be individual cancelled from this screen if the user account has sufficient privileges.
Across the top of the page are the menu options, which will be explored within this manual:
Monitor – displays active alarms.
Paging – manual paging to contacts.
Report – generate reports from alarm activation data.
Residents – create resident profiles.
Maintenance – configuration of alarms, messages, contacts and devices.
System – global communication settings, license status and users accounts.
Logout – logs out the current user.
Users
SureaCare provides organisations the ability to restrict access to critical features.
There are three levels of access:
User: cannot cancel alarms, unable to access maintenance menu and
Super: unable to access maintenance menu
Administrator: unrestricted access
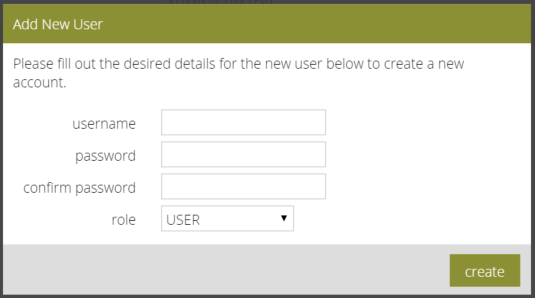
Create a User Account
- Select “Users” from the system menu.
- Select “New User”.
- Type a user name.
- Type a password and confirm password.
- Select the appropriate level of access.
- Select “create”.
Comms
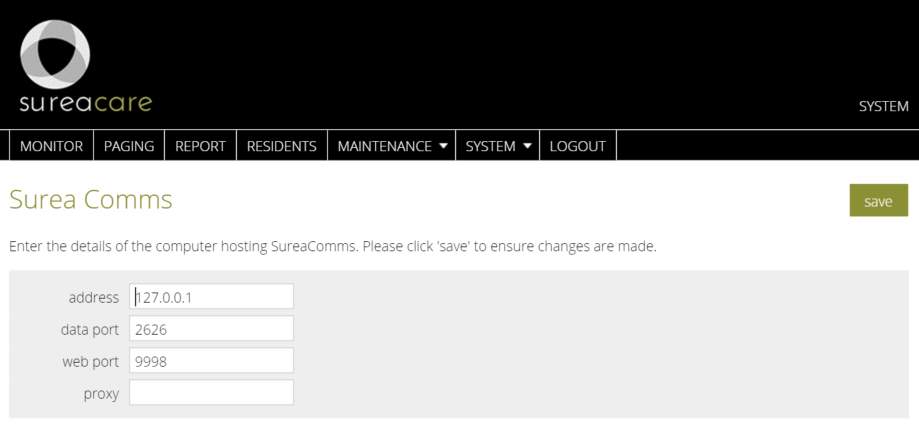
All alarm information used by SureaCare is supplied from SureaComms data interfaces. The network parameters of the SureaComms server are required to be configured before activation data can be received.
- Select “Comms” from the system menu.
- Enter the I.P. Address of the SureaComms server – if local leave as “127.0.0.1”
- Enter the data port specified in relevant SureaComms ethernet server –
default “2626”.
- Enter the web port specified in the relevant SureaComms Server –
default “9998”.
- Enter a proxy server address if required.
- Select “save”.
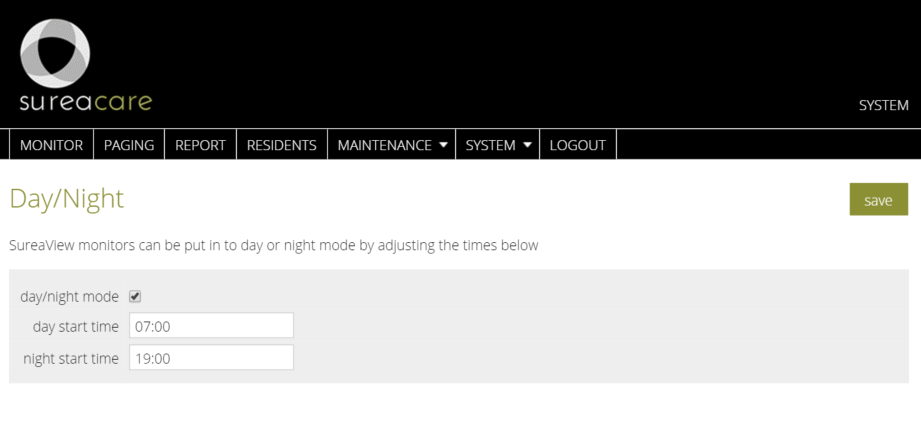
Day / Night -SureaView
Some facilities in the health and aged care sector provide overnight care to individuals. During these low activity periods it is possible to mute the sound on SureaView monitors to minimise disturbances.
- Select “Day/Night” from the system menu.
- Check/uncheck “day/night mode”.
- Set the day start time – resumption of sounds events.
- Set the night start time – commence sound suppression.
- Select “save”.
This application provides you with on / off sound.
License
Surea applications are licensed via an online licensing server. The applications “check-in” periodically to validate their integrity. This function also provides system critical data to nominated contacts, notifying recipients via email when the application fails to contact the license server.
All current SureaCare license information is displayed on this page, including:
Registered Site Name – The name of the installation supplied to Aerus upon license purchase.
Status – the current license type – licensed or trial.
Last check-in – the last successful interaction with the Aerus licensing server.
Attempted check-in – the last time SureaCare attempted to contact the Aerus licensing server.
If the system license status has been altered, either by consultation with Aerus Technologies or due to intermittent contact with the license server, a manual check in can be undertaken.
- Select “License” from the system menu.
- Select “manual check-in”.
If SureaCare successfully contacts the license server and validates, it will display:
“License validated successfully”.
If SureaCare cannot reach the license server or the license isn’t valid, it will display:
“An error occurred whilst validating your license, please try again later”.
If an error is presented, check your network settings:
- Ensure the host server is allowing TCP port 80 through its firewall.
- Ensure the host network is allowing TCP port 80 through its firewall.
- Add a proxy server address and port in the comms menu if required.
Should a successful check-in still be unachievable, contact Aerus to resolve.
For more information on licensing, reference the Surea Installer Manual.
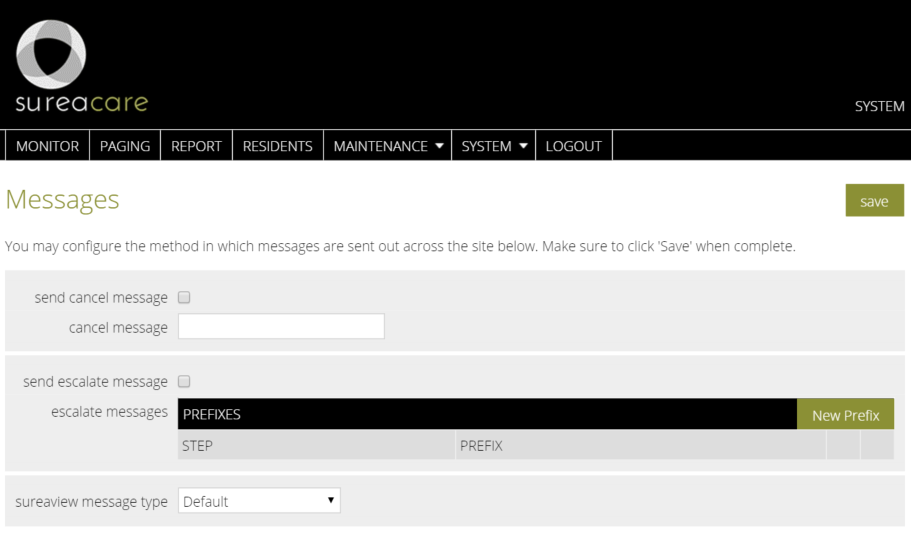
Messages
Cancel Messages
When an alarm event has ended, SureaCare can send out a cancel message to notify paging recipients. When the alarm has been cancelled the message is re-sent to the last used escalation contacts, with a customisable cancel message prepended.
Enable Cancel Messages
- Select “Messages” from the system menu.
- Check “send cancel message”.
- Type text to be prepended to the message – example “Cancel:”
- Select “save”.
Escalate Messages
Alarm event that aren’t attended to within a designated time frame can be escalated to additional contacts to ensure a response. Escalation messages can be customised to notify the paging recipients that the alarm event has not been actioned. Each alarm step can have specific prepended text, for example:
Step 1: “call room 1”
Step 2: “reminder: call room 1”
Step 3: “urgent: call room 1”
Escalations are unlimited.
Configure Escalate Messages
- Select “Messages” from the system menu.
- Select “New Prefix”.
- Type escalation step number.
- Type escalate message.
- Select “add”.
SureaView Message Type
SureaView monitors display the default paging message for an alarm event – zone tree or override message. This method minimises programming, however paging messages may not be appropriate for display on monitors for reasons including:
- Patient/resident sensitive information.
- Message length – SureaView auto adjusts font size, causing long messages to be decreased in size.
- Format – paging messages may not be pertinent for display use.
SureaCare provides the ability to choose between the default message and the annunciator message.
Configure SureaView Message Type
- Select “Messages” from the system menu.
- Select the appropriate SureaView message type.
- Select “save”.
Alarm Types
SureaCare processes all incoming data events as alarms. Before alarm programming can commence, these alarm types must be created.
Properties that can be applied to alarm type include:
Name – the name of your alarm type.
Abbr – a message abbreviation for SureaView monitor.
Foreground and background colours – when the colour fields are selected, a picker box opens with a slider and fine tune area. Save the colour by selecting the circle in the bottom right hand corner.
Priority – an arbitrary number between 0 and 100 to determine the priority of the alarm in SureaCare, SureaView and SureaCare Android. “0” being the lowest priority, “100” the highest.
Function digit – a numerical value determining the sound output from an end user device (DECT, pager, etc.).
Annunciator colour – determines the colour and sound produced by and Austco annunciator if required.
Alarm sound – apply a .wav audio file to the alarm type, either from samples provided or a custom file you are providing. This sound will be played from SureaView monitor and SureaCare Android.
Sound interval – the repeat interval of the sound file applied in seconds. For example “0” is constant, “60” is one minute and “300” is five minutes.
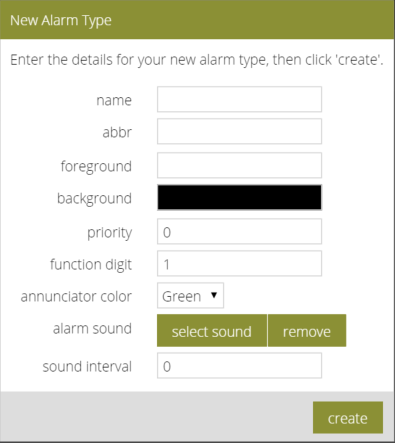
Create an alarm type:
- Highlight “Alarm Types” from the Maintenance menu.
- Select “New Alarm Type”.
- Populate the required fields (reference descriptions above).
- Select “save”.
Zones
Creating Your Site Structure
A key principle of SureaCare is that all programming is structured around your zone tree. If configured correctly the zone tree will automatically provide your outbound message and make sure it is delivered to the correct recipients.
SureaCare uses “parent – child” terminology to explain its programming nature. A child zone is always nestled under its parent, and inherits its qualities, including rosters and message order. If these values aren’t specified at the parent level, they are inherited from the “great grandparent”, and so forth.
The top zone should be the highest level in your organisation – the facility or precinct name. Once this has been established, sub or “child” zones can be created reflect the layout of the organisation, for example:
Site Name > Floor > Wing > Room.
There is no limit to the amount of zones that can be created, however it is critical to plan you organisation carefully. Things like creating an ensuite sub zone or having an ensuite level of call can affect the amount of duplication required.
Zone Programming
Highlight the maintenance menu and select “Zones” – this will open the Zones configuration page.
To name your installation:
- Select “edit” beside the zone name
- Rename as required.
- Select “save”.
This also changes the name on the main banner. A zone name can be changed at any time, but may affect your outgoing message.
To create a child zone:
- Select the “New Zone” button in the zones table of the appropriate parent zone.
- Name your zone.
- Select “save”.
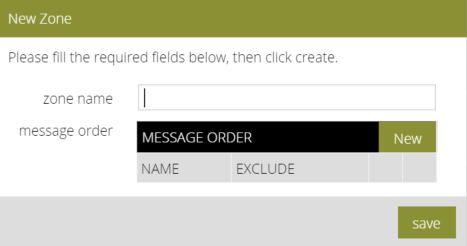
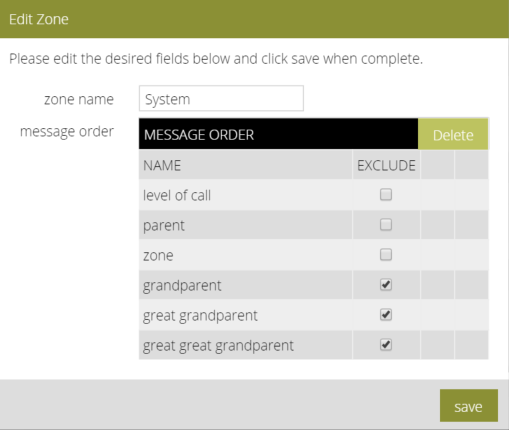
Message Order
In SureaCare, your outgoing message to recipients (DECT, pagers, monitors etc.) can be determined by your zone tree structure. This feature is configurable at each individual zone, however more importantly each zone inherits its parent zones programming, preventing duplication and reducing programming time.
You are not required to use this feature – an over-ride message can be programmed – (see Alarm Points)
- After creating a new zone, select “edit”.
- Select “New” message order.
- Check or uncheck to include/exclude required components – level of call, zone and parent zones.
- Use the up and down arrows to arrange the message order to suit.
- Select “save”.
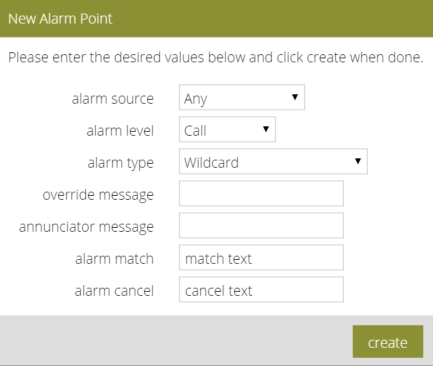
Alarm Points
As mentioned in “Alarm Types”, SureaCare processes all incoming data events as alarms. Once your alarm types have been pre-determined in the “Alarm Types” menu, new alarm points can be created.
Alarm points are created within the relevant zone.
Properties to be populated:
Alarm source: Select the relevant SureaComms interface the data is be routed from. The default setting is “Any” – SureaCare references all interfaces for matching alarm values.
In some circumstances this may not be appropriate as duplicate / erroneous data from non-relevant interfaces may trigger alarms.
Alarm Level: Select the appropriate alarm type relevant to your alarm that has been created in “Alarm Types”.
Alarm Type: Select the type of interface the alarm point will be matching from.
When the appropriate alarm interface has been selected, the properties of the alarm point entry fields will change to suit the required match data.
Override Message: If the default zone tree message is not appropriate for the alarm point, an override message can be entered in this field.
This message will be sent to recipient devices including DECT, pagers, as well as SureaView and Surea Android clients.
Annunciator Message: If required, enter a message that will be displayed on nurse call remote monitors. This message can also be sent to SureaView clients (see “Messages”)
The remaining input fields in the form pertain to input data from the relevant interface. These values vary – see “Alarm Point Programming”.
New wildcard alarm point:
New Ekahau alarm point:

Alarm Point Programming
Below are programming examples for the interfaces currently supported by SureaCare.
Determine your incoming data and use this reference to complete the alarm point dialog.
Examples of Data Strings for various interfaces:
AIM – Commtech Alarm Interface Module.
Format: (AIM Node ID)+(Input No.).
Example:
Alarm Match: 1+12
Alarm Cancel: 1-12
Austco Mk2 – Medicom and Callguard.
Format: (Node ID) + (Priority, Input No. OR annunciator message).
Example:
Alarm Match: 01+01E001
Alarm Cancel: 01-01E001
Austco ASM Serial OR UDP
Format: (Node ID/Alarm Type)+(Input No./Priority).
Example:
Alarm Match: 1/A+1/1
Alarm Cancel: 1/A-1/1
Austco ASM UDP – (IP Connect)
Format: (IP Connect Node ID/Alarm Type)+(IP-CCT ID.Zone ID.Point ID.Function ID/Alarm Type/Priority).
Example:
Alarm Match: 0/A+10.1.1.1/2
Alarm Cancel: 0/A-10.1.1.1/2
Austco IP – IP-CCT output log.
Format: Controller: (Controller ID), Position (Zone ID), Input (Alarm Point ID), function (virtual ID).
Example:
Controller: 10
Position: 1
Input: 1
Function: 0
Door Monitor – Aerus Door Monitoring Software.
Format: (Node ID)+(Input No.)
Example:
Alarm Match: 1+12
Alarm Cancel: 1-0
Ekahau – Ekahau eventstream rules
Format: rule id (Ekahau rule no.), zone id (Ekahau Zone ID), and tag type (Ekahau tag type).
Example:
Rule id: 123
Zone id: 45
Tag Type: B4
Ekotek – Ekotek device activation
Format: level (call or battery), device ID (Last seven digits of serial no.).
Example:
Level: Call
Device ID: 0104602
Inovonics – Frequency Agile
Format: (device ID)+(activation no.).
Example:
Alarm Match: 12345+1
Inovonics – Echo Stream
Format: transmitter id (serial no), input (activation no.), ignore cancel (check box).
Example:
Transmitter id: 09264578
Input: Input 1
Ignore cancel: (tick)
JCT
Format: alarm point id (controller number + alarm point ID)
Example:
Alarm point id: (100456)
KIRK – Kirk Wireless Server Duress Alarms.
(No configuration necessary)
Lightcall DOS – Lightcall alarm protocol
Format: (Node ID)+(Call Level [numeric]).
Example:
Alarm Match: 1+12
Alarm Cancel: 1-0
Lightcall QPP – Lightcall Quickpage Protocol
Format: (Node ID)+(Input No.)
Example:
Alarm Match: 1+12
Alarm Cancel: 1-12
PET – PET/TAP Alarm Activation
Format: pet capcode/ext (numeric), pet message (whole message)
Example:
Pet capcode/ext: 123
Pet message: Call Room 1
Questek CNI
Format: (CNI)+(DIMM)+(Input)
Example:
Alarm Match: 1+1+1
Alarm Cancel: 1-1-1
Ademco High Speed Serial – raw serial interface with ACK return, developed for medical diallers.
Format: (raw match data)
Example (Ademco):
Alarm Match: 12 0001 5555 5155 1
Alarm Cancel: 12 0001 5555 5355 1
Tunstall
Format: (Node ID)+(Input No.)
Example:
Alarm Match: 1+12
Alarm Cancel: 1-12
Wildcard – raw data activation, using asterisks as delimiters.
Format: “*match data*”
Example: “fire alarm zone 14 nurse station”, “alarm cleared“
Alarm Match: *alarm*zone 14*
Alarm Cancel: *cleared*
- Raw text from match data can be used in an alarm point over-ride message. By adding the asterisk number (counting from zero), all text after the asterisk will be displayed, for example,
“FIRE: <2>” will display as “FIRE: nurse station”.
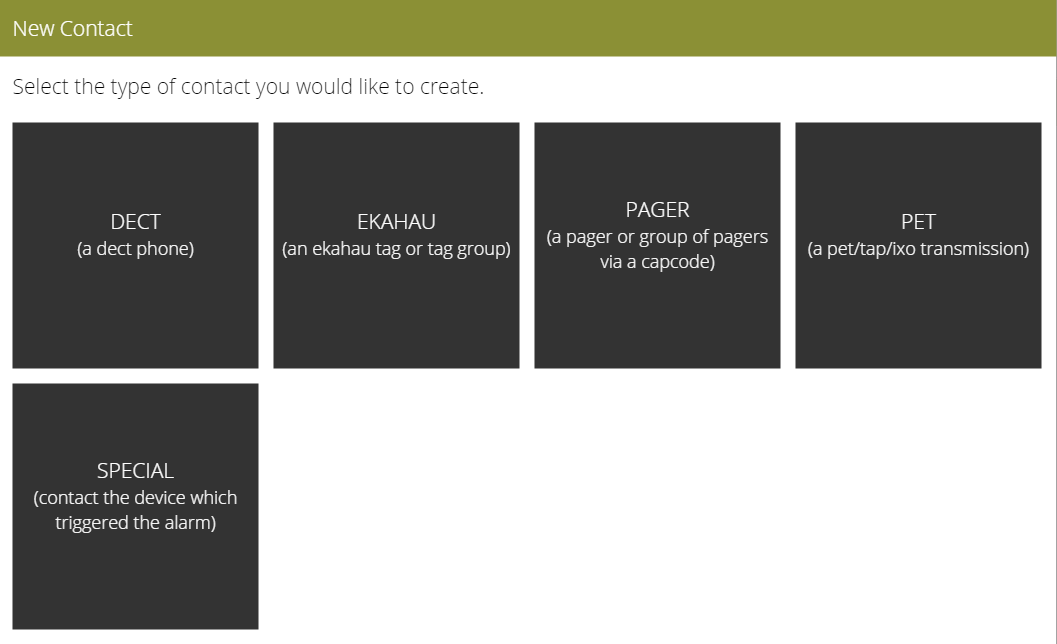
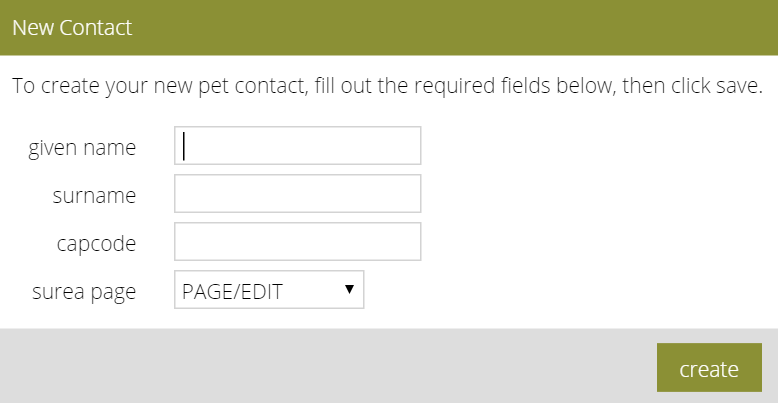
Contacts Devices
End user message devices are regarded as contacts in SureaCare. This includes traditional messaging devices such as alphanumeric pagers and DECT handsets, and also applies to Ekahau tags.
Create a Contact
- Select “Contacts” from the maintenance menu.
- Select “New Contact”.
- Select the type of contact required.
- Type a relevant pager name (given and/or surname).
- Type the devices unique id (capcode, local no. , etc.)
- Select Save.
Groups
When alarm messages are intended for multiple end users simultaneously, a paging group is required. All recipients within this group will received the intended message.
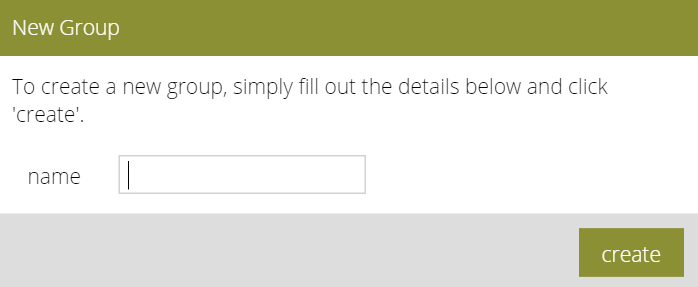
Create a Group
- Select “Groups” from the maintenance menu.
- Select “New Group”.
- Type a name for your group. Select “save”.
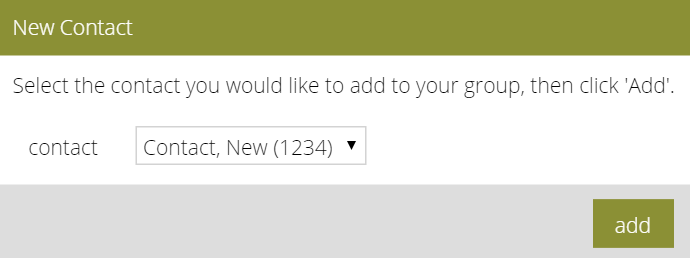
Adding Group Contacts
- Select the group name in the “Groups” page.
- Select “New Member”.
- Select the contact from the drop down menu. Select “add.
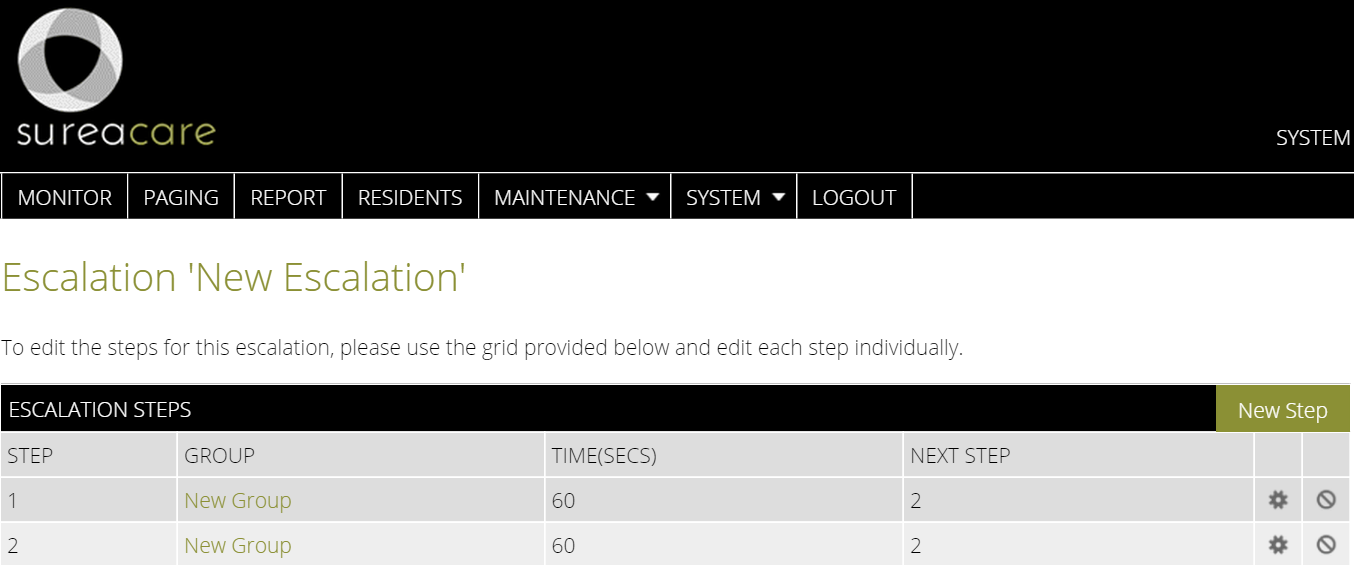
Escalations
Escalations determine how frequently alarm messages are sent to contacts. All alarm messages in SureaCare are generated within escalations, even if only a singular message is required. This ensures a uniform approach to the programming process, resulting in a more transparent system.
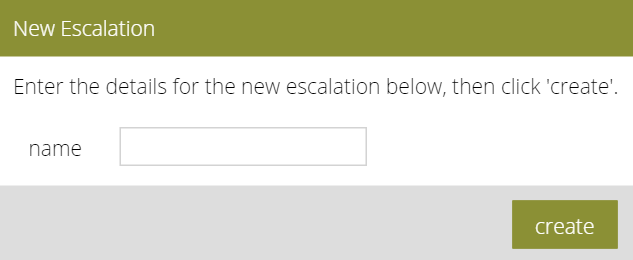
Create an Escalation
- Select “Escalations” from the maintenance menu.
- Select “New Escalation”.
- Type a name for your escalation. Select “create”.
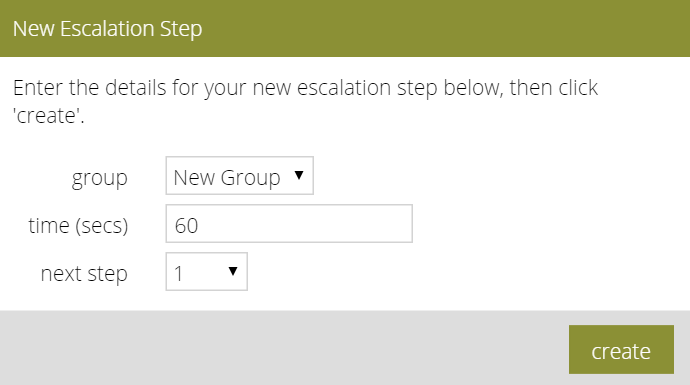
Escalations comprise of “steps”. Each step contains the relevant paging group, and the delay period (seconds) to the next step. An escalation continues to function as programmed until the alarm has been cancelled, or the “end” step of the escalation is reached.
Escalation Examples:
Singular (once only):
Create Escalation Steps
- Select the escalation name from the “Escalation“ page.
- Select “New Step”.
- Select the required paging group.
- Specify the time (in seconds) to the next escalation.
- Select the next step to be invoked after the time period specified.
- Select “create”.
Rosters
In SureaCare rosters determine where alarm point messages are sent, and at what time of day. Rosters are created within zones, and assigned to alarm types.
If an alarm does not have a roster association with in its zone, it will inherit its parent zones’ roster for that alarm type. This roster will appear transparent to signify that is inherited.
It is good practice to apply your rosters as high as possible within your zone tree, and only apply rosters at the acute levels where exceptions occur.
Rosters can also be set to “any” alarm type, acting as a “catch all” for alarm types that have not been already associated so they are not ignored.
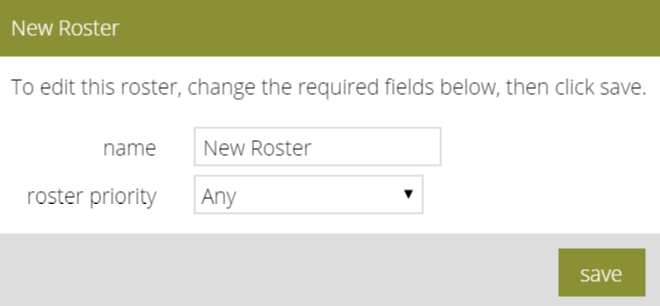
Create a Roster
- Select “New Roster” in the zone required.
- Type the roster name.
- Select the roster alarm type. Select save.
Rosters are unlimited.
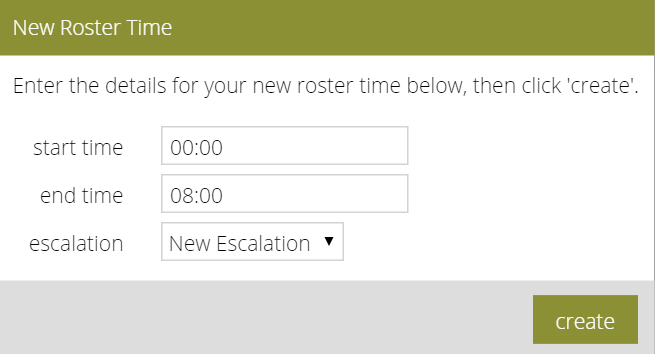
Roster Times
Once a roster is created, time schedules can now be applied. SureaCare uses a 24 hour time roster, starting from “00:00” – “24:00” (midnight to midnight). An all day roster would have the aforementioned parameters and would be appropriate for global events such as fire alarms, duress alarms etc.
A roster time starting from “07:00” – “15:00” may be more common in a workplace with shift orientated messaging. Roster times that cross into the next day must be split into two entries, for example:
“23:00” – “07:00” would be created as “23:00” – “24:00” AND “00:00” – “07:00”.
After the parameters for the roster time have been entered, an escalation can be assigned from the list available. Alarms activated within this time period will now be governed by the properties of this escalation.
New Roster Time
- In Zones, select the name of the roster. This will open the roster.
- Select “New Time”.
- Insert the required start and end time parameters.
- Select escalation. Select save.
Devices
SureaView and SureaMobile, along with Annunciators are classed as devices in SureaCare. Messaging to these devices is handled differently to traditional contacts as active alarms remain on these devices for the duration of the call.
Device Types
SureaView Monitor
Surea LCD monitor. Type an appropriate name for the device and assign a unique ID No. Between 1 and 100.
Annunciator
Austco Mk2 serial protocol display. Type an appropriate name for the device and enter the devices monitor address.
UDP Annunciator
Austco I.P. Annunciator. Type an appropriate name for the device and enter the device’s I.P. address and UDP listening port (default 25137)
SureaCare Android
SureaCare Android devices will self-populate in the device table when application is configured. Reference the MAC address of the handset to determine the entry, and rename the device.
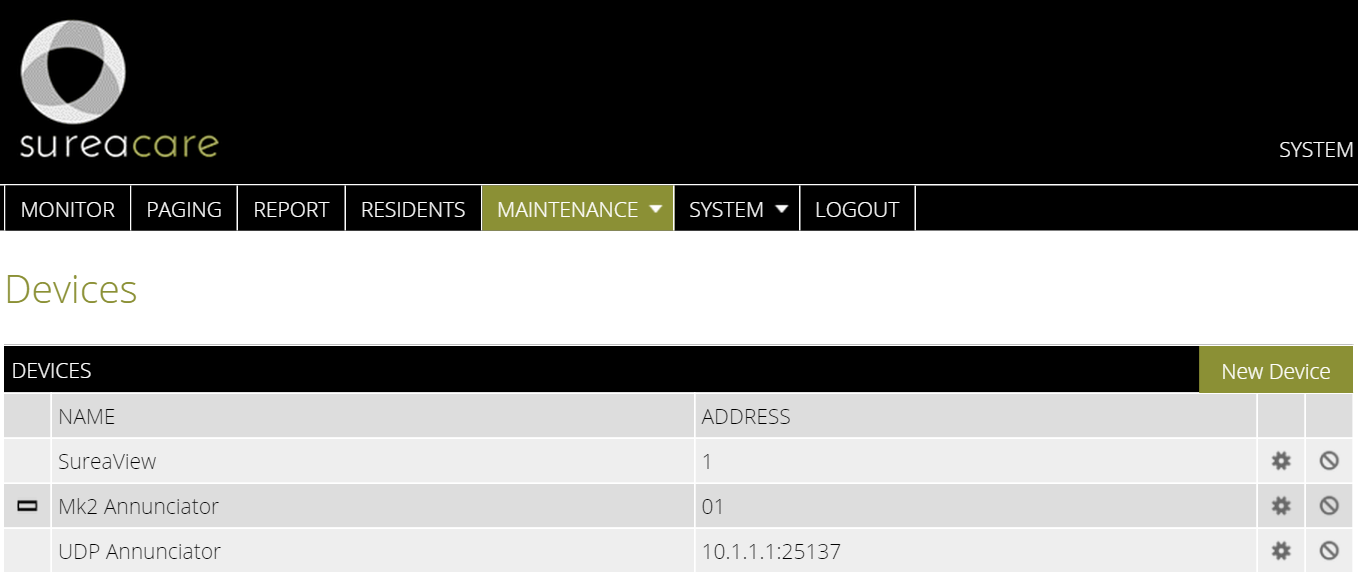
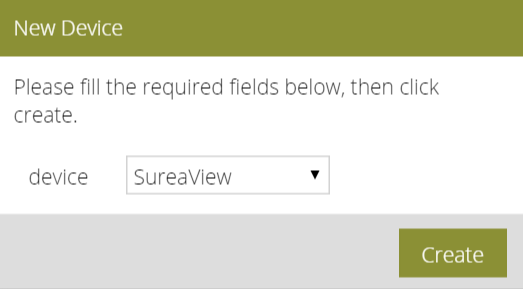
Create a Device
- Select “Devices” from the maintenance menu.
- Select “New Device”.
- Enter an appropriate name for the device.
- Enter the devices unique parameter (see “Device Types”).
- Select “create”.

Device Zoning
In order for a device to receive the correct alarms, it must be assigned to the relevant zone. The device will then display all alarms from the assigned zone, and all child zones below.
Assign a Device
- Select “New Device” in the required zone.
- Select the relevant device.
- Select “create”.
SureaView
SureaView devices can be further configured to display only selected alarm types from the assigned zones and child zones.
Once the SureaView device has been assigned to the zone,
- Select the edit “cog”.
- Select/De-select alarm types as required.
- Select “save”.
Residents
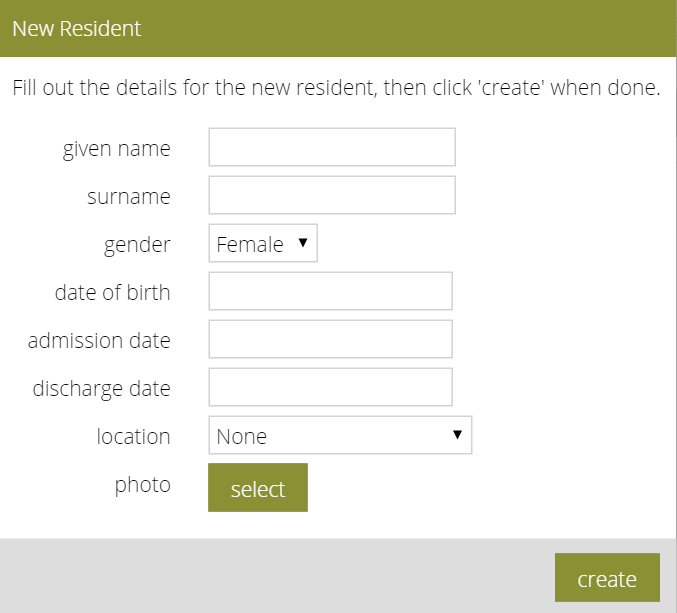
Basic resident/patient data can be added to SureaCare. This feature is designed to associate residents to rooms, and as reference for nursing staff.
Given Name.
Surname.
Gender.
Date of Birth.
Admission Date.
Discharge Date.
Location – Zone relative to resident, i.e., Room 5.
Photo – Upload an image representing the resident, which will display on SureaAndroid handsets. (Max resolution 1280*720px)
Create a Resident
- Select “Residents” from the monitor page.
- Select “New Resident”.
- Populate the required fields (see “Residents”).
- Select “create”.
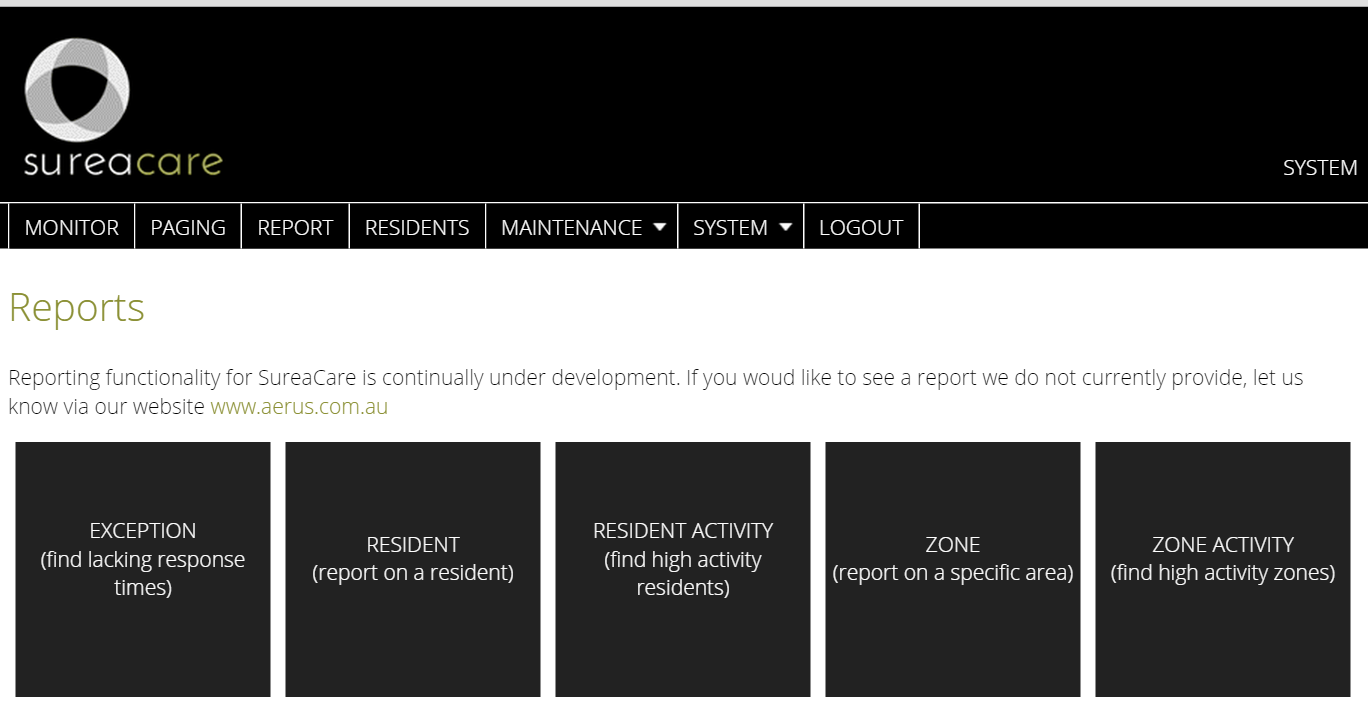
Reports
Report types include:
Exception – Report on all alarms that breach nominated time limit.
Resident – report on alarm events generated by an individual.
Resident Activity – determine high frequency resident activations.
Zone – Report on all alarm events within the ones selected and all child zones below.
Zone Activity – determine high frequency alarm events.
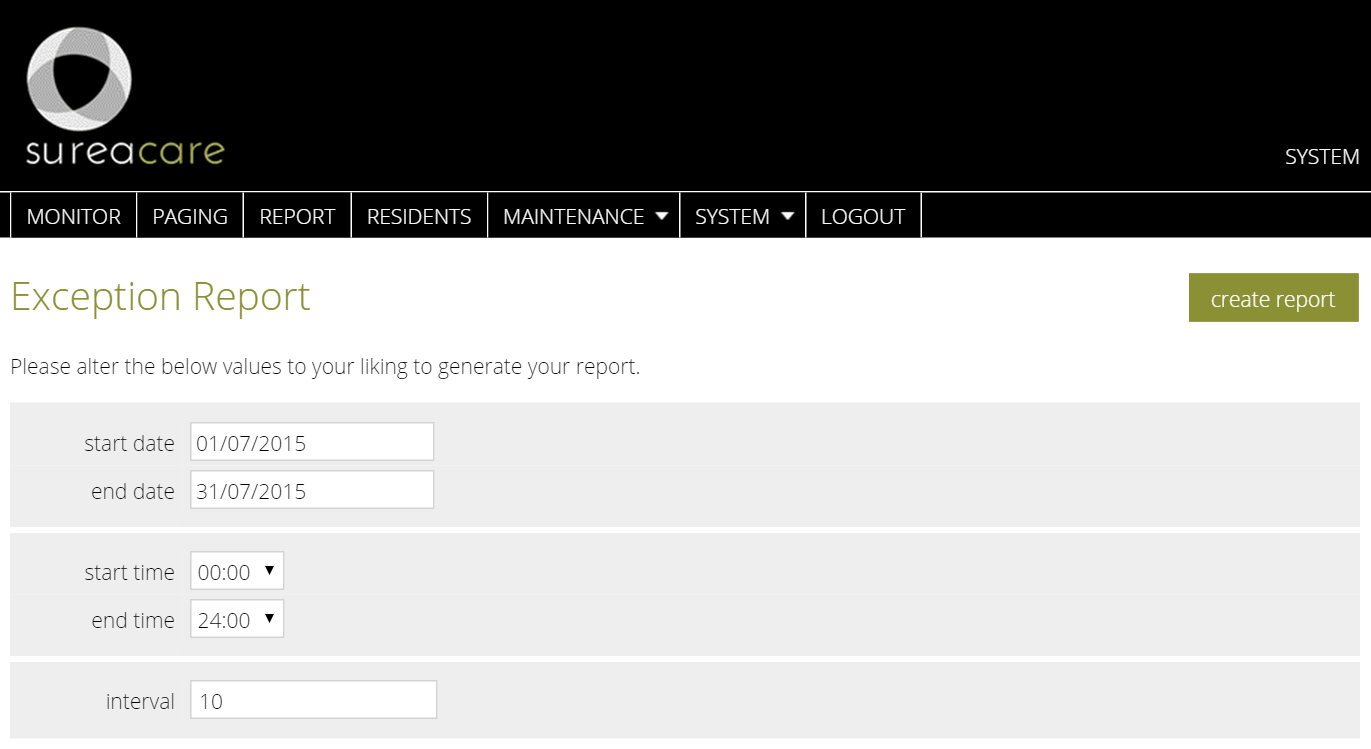
Generate Reports
- Select “Report” from the monitor menu.
- Select the appropriate report type.
- Enter the require parameters – date, time, resident/zone/exception time etc.
- Select “create report.
Note – large reporting time frames and reports generated from remote machines can take longer times to populate.
Report Results
The report result screen displays the alarm event data requested. It provides a summary of the report values requested by the user, a pie chart breakdown of the data, total alarms within the report and statistical info including mean and menial values.
Reports can be converted into PDF documents for accreditation an archiving purposes.
Paging
Send a paging message to an individual recipient.
- Select “Paging” from the monitor menu.
- Select the designated contact from the contacts window.
- Type a message in the message windows.
- Select “send”.
If greater paging functionality is required, contact Aerus Technologies and enquire about SureaPage, our advanced paging terminal application.

